

Scenario:
In this article we will explain the basic configuration required to configure a Wireless Point to Point WDS Bridge with a pair of Ubiquiti NanoStation M5 AP/CPE. You should be able to follow this guide with any of the Ubiquiti AirMAX airOS Devices (Loco M, NanoStation M, NanoBridge M, AirGrid M, PowerBridge M, PicoStation M, Bullet M and the Rocket M Series).
Important:
This article assumes you know how to login to a NanoStation. If this is not the case please refer to "Logging in to a Ubiquiti Wireless Access Point or Router".
Step 1:
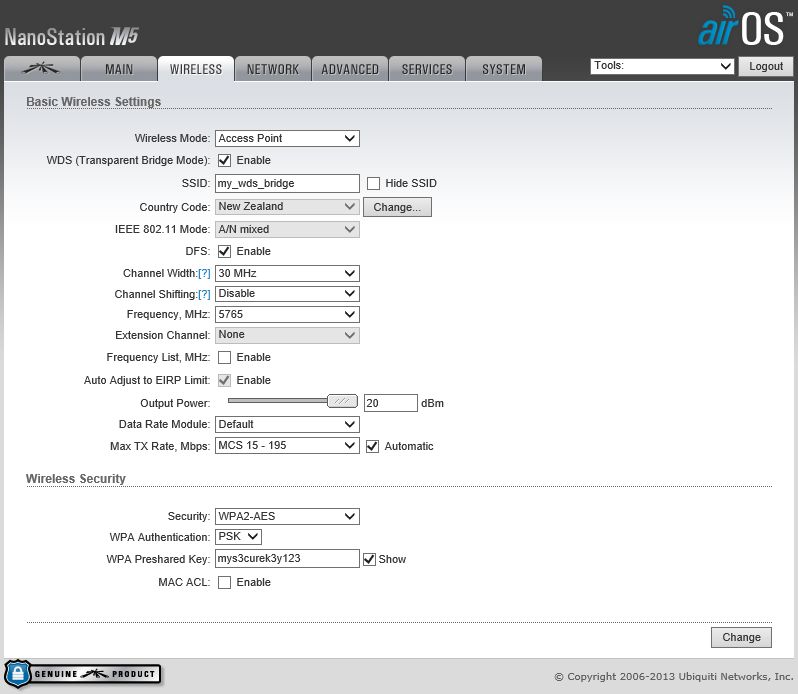
Plug in the first NSM5 (Access Point) into your laptop or network and make the following changes on the Wireless tab.
Wireless Mode: Access Point
WDS (Transparent Bridge Mode): Enable
SSID: my_wds_bridge
Channel Width: 30 MHz
Frequency, MHz: 5765
Output Power: 20dBm
Security: WPA2-AES
WPA Authentication: PSK
WPA Preshared Key: mys3curek3y123
Select Change but do not Apply settings yet.
If you need to increase the Output Power above 20dBm you must first enable Installer EIRP Control under the Advanced tab (Change and Apply Settings).
Under the Wireless tab you should now be able to disable Auto Adjust to EIRP Limit which will allow you to increase the Output Power - (Ensure you do not transmit above the legal EIRP for your Frequency).
Step 2:
On the Network tab make the following changes.
Network Mode: Bridge
IP Address: 192.168.1.200
Netmask: 255.255.255.0
Gateway IP: 192.168.1.1
Primary DNS IP: 192.168.1.1
Select Change but do not Apply settings yet.

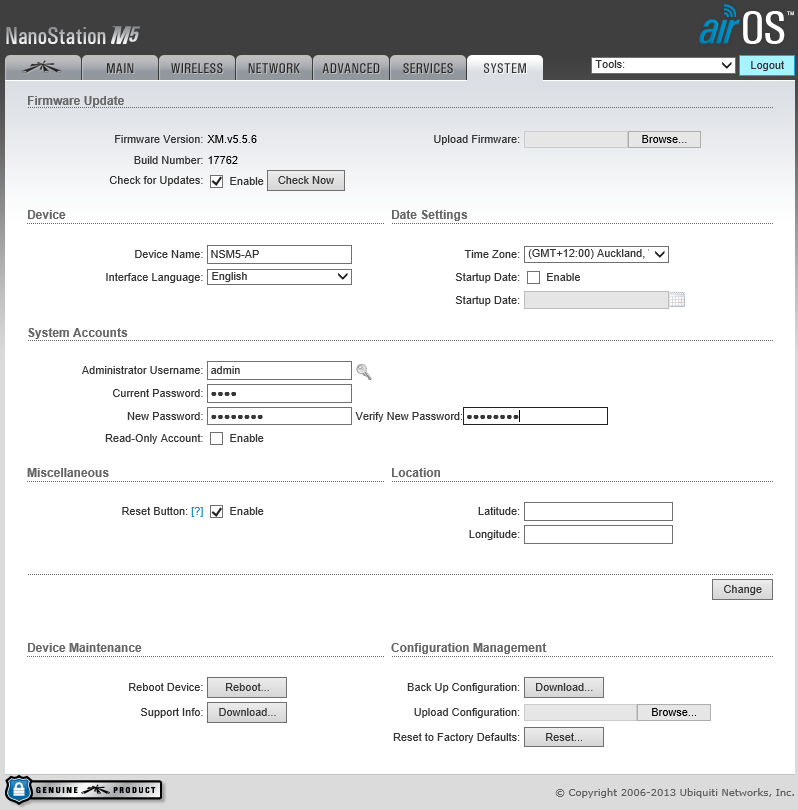
On the System tab change the following.
Device Name: NSM5-AP (Optional)
Time Zone: (GMT+12:00) Auckland, Wellington, Fiji, Kamchatka (Optional)
Administrator Username: admin (Optional)
Current Password: ubnt (Optional)
New Password: mys3cr3t (Optional)
Select Change and Apply settings.
IMPORTANT:
Before proceeding, unplug the NanosStation and re-locate it to the other side of you work room and connect the Power (PoE) only i.e. no LAN connection.
Step 4:
Connect the second NSM5 (Station) to your laptop or network and navigate to the Wireless tab.
Wireless Mode: Station
WDS (Transparent Bridge Mode): Enable
Channel Width: 30 MHz
Select Change and Apply settings.

Click the Select button next to the SSID field.
Click the radio button next to your SSID (my_wds_bridge) and the press Select.
Enter WPA Preshared Key: mys3curek3y123
Select Change but do not Apply settings yet.

On the Network tab make the following changes.
IP Address: 192.168.1.201
Netmask: 255.255.255.0
Gateway IP: 192.168.1.1
Primary DNS IP: 192.168.1.1
Select Change but do not Apply settings yet.

Step 7:
On the System tab change the following.
Device Name: NSM5-ST (Optional)
Time Zone: (GMT+12:00) Auckland, Wellington, Fiji, Kamchatka (Optional)
Administrator Username: admin (Optional)
Current Password: ubnt (Optional)
New Password: mys3cr3t (Optional)
Select Change and Apply settings.

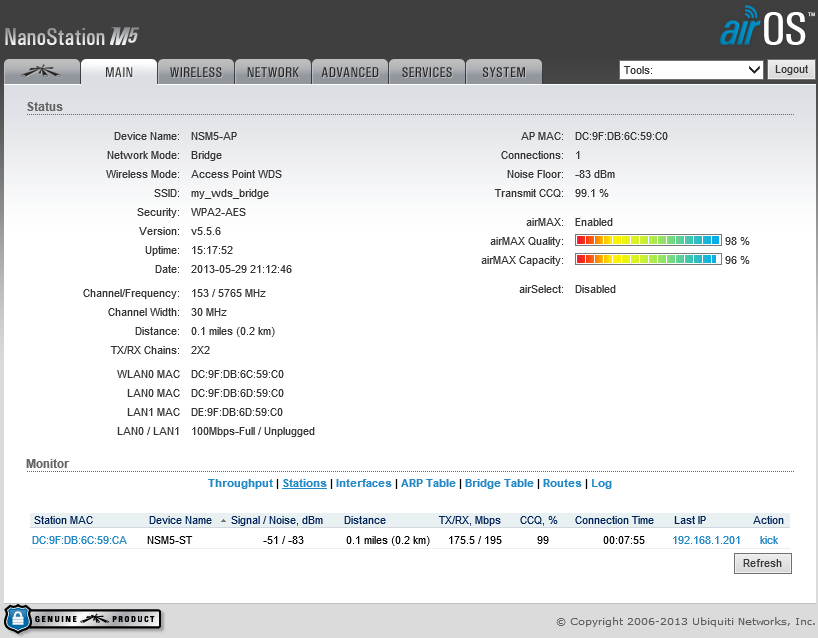
Verify the bridge has been configured successfully by logging into both Devices and checking the connection status on the Main tab.
Note: If you cannot login to the NSM5-AP (Access Point that currently has PoE only i.e. No LAN connection you will need to troubleshoot why you do not have connectivity.
Access Point (NSM5-AP):

Thank you soooo much, i just finish first step with your guide :)
ReplyDeleteI will try to learn http://blog.gowifi.co.nz/2013/07/ubiquiti-antenna-alignment-and-link.html
Airmax Nanostation NSM5 köprü, noktadan noktaya bağlantı için gayet başarılı kılavuz çok teşekkür ederim
i have rocket m-5 P2p Link. the link is working in 192.168.1.0/24 network but I wan't route & connect to my two efferent network in this p2p link.
ReplyDelete192.168.1.0/24 to 192.168.2.0/24 network.
Hi there, are the Rocket M5 in Bridge mode for the network mode or Router Mode? you need either a default route or static route for the network you want to go to but must be done on the router from your originating or source network / router. i.e. if routing from router A to the network beyond router B, then the static route to router B's network must be configured on Router A.
ReplyDelete