

Scenario:
In this article we will explain how to perform a Netinstall on a MikroTik RouterBOARD with or without a serial port.
Preparation:
Netinstall using a RouterBOARD with a Serial Port - Start at Step 1.
Netinstall using a RouterBOARD without a Serial Port - Start at Step 4.
Step 1:
Download PuTTY Terminal Emulator:
http://the.earth.li/~sgtatham/putty/latest/x86/putty.exe
Step 2:
Configure PuTTy for MikroTik Serial Console access (Ensure you select the correct COM
port for your serial port - you can find this under the "Ports" section of your "Device Manager" in Windows).
Serial line to connect to: COM1 (Serial Port found in Device Manager)
Speed (baud): 115200
Data bits: 8
Stop bits: 1
Parity: None
Flow control: None

Plug your serial cable into your RouterBOARD. Click open in PuTTy then power
on your RouterBOARD. You only have about 2-3 seconds to hit any key to enter
the RouterBOOT Menu so be quick!
Step 4 - (No Serial Port - Start Here):
Download the RouterOS Upgrade package and corresponding Netinstall files from the MikroTik Website (I have chosen the latest version as of writing v6.1): http://www.mikrotik.com/download.html

Extract and Run Netinstall and select ‘Net booting’. Enable the boot server and give it an
IP Address on the same subnet as your PC / Network.
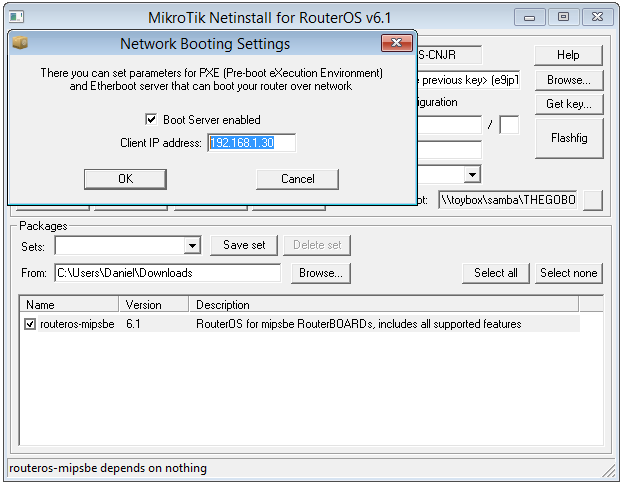
Connect the RouterBOARD Ethernet port 1 to your PC / Network. Ensure your PC has a static or DHCP address on the same subnet as the Boot Server configured above. i.e. 192.168.1.10/24.
Step 7 (Serial Port - Skip this Step):
Hold the reset button whilst applying power to the Router.
Release the reset button when the ‘ACT’ led goes out (it will flash for a while
the go out). A few seconds later you should see Ethernet port 1 led come on
and your device will show up in Netinstall.
Step 8 (No Serial Port - Skip this Step):
Issue the following in the Serial Console RouterBOOT menu:
Press "o" - boot device
Press "1" - boot Ethernet once, then NAND
Press "x" - exit setup

Browse to the folder location of your "routeros.npk" package downloaded in Step 4.
Step 10:
Select your router in the list and then choose the RouterOS package
you have downloaded and click "Install".

Once the Netinstall has finished click "Reboot" (if this is greyed out the router has automatically initiated the reboot process.
Step 12:
Follow the MikroTik RouterBOARD Firmware Upgrade procedure to upgrade the RouterBOOT to the latest version included with the recently installed RouterOS package.
Do I need to use serial cable or a normal network cable?
ReplyDeleteThis will work with or without a serial cable as mentioned at the top. See Preparation for where to start with both options.
Delete