Wednesday, October 9, 2013
MikroTik Hotspot Part 2 - Hotspot Portal Customisation
Example:
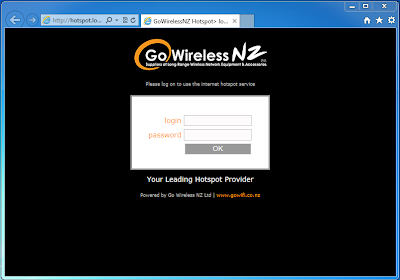
In this example we will show how to customise the Hotspot Portal login page to suit your company. We will also create a link on the login page to our website (www.gowifi.co.nz) which we will use for the next lesson about creating a basic walled garden. It is expected that you have at least a basic understanding of HTML before proceeding.
Step 1:
Login to RouterOS using winbox and navigate to the Files menu.
Step 2:
Drag and drop the hotspot folder to your desktop (this will copy all of the contents within the hotspot folder as well).
Step 3:
In the hotspot folder on your desktop right-click and edit login.html (You can choose to edit in notepad however i would recommend a program like Notepad++ as it highlights the HTML syntax for you making it easier to read).
Step 4:
Here is a example of the changes i have made to login.html to suit our company. All changes have been highlighted in red so you can see the changes i have made.
Please also note if you wish to upload your own image or logo this should be placed in the img images folder with all of the other images.
<!DOCTYPE html PUBLIC "-//W3C//DTD XHTML 1.0 Transitional//EN"
"http://www.w3.org/TR/xhtml1/DTD/xhtml1-transitional.dtd">
<html>
<head>
<title>GoWirelessNZ Hotspot > login</title>
<meta http-equiv="Content-Type" content="text/html; charset=UTF-8" />
<meta http-equiv="pragma" content="no-cache" />
<meta http-equiv="expires" content="-1" />
<meta name="viewport" content="width=device-width; initial-scale=1.0; maximum-scale=1.0;"/>
<style type="text/css">
body {background-color: #000; color: #737373; font-size: 10px; font-family: verdana;}
textarea,input,select {
background-color: #FDFBFB;
border: 1px solid #BBBBBB;
padding: 2px;
margin: 1px;
font-size: 14px;
color: #808080;
}
a, a:link, a:visited, a:active { color: #AAAAAA; text-decoration: none; font-size: 10px; }
a:hover { border-bottom: 1px dotted #F90; color: #F90; }
img {border: none;}
td { font-size: 14px; color: #F90; }
</style>
</head>
<body>
$(if chap-id)
<form name="sendin" action="$(link-login-only)" method="post">
<input type="hidden" name="username" />
<input type="hidden" name="password" />
<input type="hidden" name="dst" value="$(link-orig)" />
<input type="hidden" name="popup" value="true" />
</form>
<script type="text/javascript" src="/md5.js"></script>
<script type="text/javascript">
<!--
function doLogin() {
document.sendin.username.value = document.login.username.value;
document.sendin.password.value = hexMD5('$(chap-id)' + document.login.password.value + '$(chap-challenge)');
document.sendin.submit();
return false;
}
//-->
</script>
$(endif)
<div align="center">
<!--<a href="$(link-login-only)?target=lv&dst=$(link-orig-esc)">Latviski</a>-->
</div>
<div style="text-align:center;height:87px;padding:0px;">
<img src="img/logo-hi-res---black-version.png" width="278" height="87" alt=""/>
</div>
<table width="100%" style="margin-top: 1%; ">
<tr>
<td align="center" valign="middle">
<div class="notice" style="color: #c1c1c1; font-size: 9px">Please log on to use the internet hotspot service<br />$(if trial == 'yes')Free trial available, <a style="color: #F90"href="$(link-login-only)?dst=$(link-orig-esc)&username=T-$(mac-esc)">click here</a>.$(endif)
</div><br />
<table width="280" height="150" style="border: 3px solid #999; background-color:#FFF; padding: 0px;" cellpadding="0" cellspacing="0">
<tr>
<td align="center" valign="bottom" height="120" colspan="2">
<form name="login" action="$(link-login-only)" method="post"
$(if chap-id) onSubmit="return doLogin()" $(endif)>
<input type="hidden" name="dst" value="$(link-orig)" />
<input type="hidden" name="popup" value="true" />
<table width="100" style="background-color: #ffffff">
<tr><td align="right">login</td>
<td><input style="width: 130px" name="username" type="text" value="$(username)"/></td>
</tr>
<tr>
<td align="right">password</td>
<td><input style="width: 130px" name="password" type="password"/></td>
</tr>
<tr>
<td> </td>
<td><input style="color:#FFF; border: 1px solid #CCC; width: 133px; background-color:#999;" type="submit" value="OK" /></td>
</tr>
</table>
</form>
</td>
</tr>
<tr>
<td align="center" ></td>
</tr>
</table>
<p style=" color:#FFF; font-size:14px; margin:0px;padding-top:10px;">Your Leading Hotspot Provider</p>
<br />
<div style="color: #c1c1c1; font-size: 9px">Powered by Go Wireless NZ Ltd | <a style="color: #F90" href="http://www.gowifi.co.nz"> www.gowifi.co.nz</a><br />
</div>
$(if error)<br /><div style="color: #FF8080; font-size: 9px">$(error)</div>$(endif)
</td>
</tr>
</table>
<script type="text/javascript">
<!--
document.login.username.focus();
//-->
</script>
</body>
</html>
Step 5:
Under the winbox Files menu, make sure you delete the hotspot folder before copying your updated folder back into winbox Files root directory (alternatively for advanced users if you know which files you have added or changed you can replace these individually).
Step 6:
Connect to your Hotspot and test your new hotspot portal login page!
Labels:
MikroTik
Subscribe to:
Post Comments (Atom)


Nice tutorial, works well.
ReplyDeleteThanks, Mark